SCRAP Humboldt upcycled bicycle trailer instructions
These are the steps that our team The Trailer Park Boys used to construct our bicycle trailer. The components below include a wheel chair, a conduit frame, a road sign tub, a cover, the tongue, and hitch. Instructions are listed below for each component.
Preparing the Wheelchair

The wheelchair is an essential item in our design.
- Disassemble wheelchair into individual parts.
- Determine which parts of the wheelchair frame will remain.
- Remove excess material from wheel chair frame.
- Grind and file cuts
- The wheelchair frame will be the starting point from which the rest of the frame will be constructed.
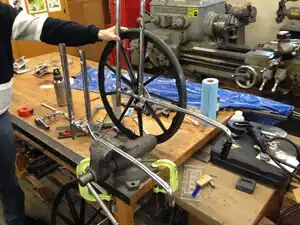
 Disassembled wheelchair
- Determining where the cuts are to be made.
 Making Cuts
 Shave off rough ends
The Frame
The primary material of the frame was galvanized 3/4" conduit. Small sections of standard water pipe where used as well.
- After acquiring conduit, sketch a rough layout for the frame
- Using a conduit bender, bend the conduit appropriately based out your layout. (Note practicing with the conduit bend beforehand is good idea)
- Cut the water pipe into eight four inch sections, these will be used to attach the conduit to the wheelchair frame.
- Braze or weld the water pipe to the wheelchair.
- Cut eight six inch section of conduit and cut parallel half circles in the end, these will separate the two horizontal loops of the frame
- Tack weld the frame together and check for general fit before permanently welding the frame together.
 Rough sketch.
 Using a conduit bender to bend conduit.
 Four pieces of cut water pipe.
 Braze the larger bends of conduit to the wheelchair
 Tack weld the smaller cuts to the conduit frame for temporary stability
Street Sign Tub
The tub was constructed entirely out of two aluminum street signs.
- Measure dimensions of your frame to sketch dimensions of your tub.
- Use a jig saw to cut the signs to your dimensions.
- Two sections of angle iron clamped to a table can be used as a solid base to make the appropriate bends in the sign.
- Use a large round object if rounded bends need to be made.
- Using extra sections of your sign for backing strips, pop rivet the tub together. (It helps to place the tub in the frame before riveting)
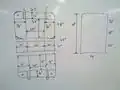 Tub dimensions
 Cut the signs using a jig saw
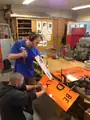 Use a mallet and a piece of wood to hammer the road sign that is set against a sharp, straight edge.
 The back end of the trailer is rounded. We used a rounded piece of aluminum to hand bend the tub to the correct position.
 One side bent to the correct position.
 Tabs cut out aluminum to be used for riveting
 Pop riveting the tub together
 The completed road sign
Cover Installation
We used Kokotat material supplied by SCRAP Humboldt for it's great defense from the elements
- Take measurements of the tub dimensions for a rough cut. Add additional length to drop down the sides for snaps and for vertical slack (in case payloads are taller than sidewalls).
- Once the cover is rough cut, lay atop the tub to fold, cut and trim as needed for a more finished fitting.
- Acquire snaps and separate female and male parts.
- Drill holes through the tub and pop rivet the male snaps in place.
- Use a proper punch to secure female snaps to Kokotat.
 Sewing the cover.
 Male ends fastened to tub.
 Female ends fastened to the cover.
Tongue Instillation
We used conduit to construct the trailers tongue as well for maximum stability.
- The first bend you want to make is a 90 degree bend that lies parallel with the front of the trailer
- Next the pipe will need to be bent so that it has a lift from the ground, rotate and make another bend so that the desired section of the pipe is ten inches off of the ground
- The tongue needs to be attached to the frame. Our solutions was to mold some of the excess road sign into a shell that fit around both the frame and the tongue and bolt road sign shell and tongue together.
 Here is how our tongue came out. It has two different types of bends so it can be hitched to the bike.
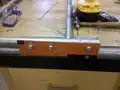 The tongue once it is fastened with bolts.
Hitch Construction
The primary components of the hitch are an aluminum slug, heim joint, angle iron, and hitch pin.
- The aluminum slug was fitting to the inside of the open end of the tongue.
- The aluminum slug was then drilled and tapped appropriately for the already acquired heim joint.
- Next the slug was fastened to the conduit via machine screws.
- A nut with a lock washer was threaded onto the heim joint prior to threading heim joint into the slug. This allows the heim joint to be fixed in a horizontally position
- The receiving end of the hitch is simply a small section of 1/4" angle iron that has be shaped and drilled to fit the rear axle diameter and the hitch pin.
 This aluminum slug that is used to connect the heim joint and tongue together.
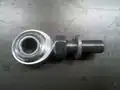 The heim joint before it is threaded into the aluminum slug
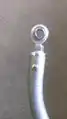 The heim joint is threaded into the aluminum slug which is fastened to the end of the tongue
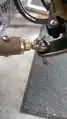 The complete and assembled hitch assembly.