CSU Research Competition 2025 Interdisciplinary trophy
This is the interdisciplinary trophy project, created by Team ID for graduate and undergraduate winners of the Interdisciplinary section of the 2025 California State University (CSU) Student Research Competition. Team ID is a small group of undergraduate engineering students enrolled in Engineering 205, an Intro to Design class, at Cal Poly Humboldt (CPH) in the Fall of 2024.
This design incorporates 6 materials with 6 respective fabrication processes joined together in the form of a conglomerate brain resting on a redwood base. The design highlights elements of the interdisciplinary research category of the competition, such as integration of distinct entities to form a whole greater than the sum of its parts. The design also represents the culture of CPH, which has an emphasis in hands-on STEM programs (Science, Technology, Engineering, Mathematics). Two twin brain trophies with this design will be given out to winners at the 2025 CSU Student Research Competition.
Background
The California State University (CSU) Student Research Competition has long given the opportunity for California State University (CSU) students from diverse academic and personal backgrounds to showcase excellence in graduate and undergraduate scholarly research. In this competition, graduate and undergraduate student teams from any of the 23 CSU campuses can enter a research project into one of the 10 research categories provided by the competition.
CPH, one of the 23 CSU campuses, will host the 39th annual CSU student research competition for the first time from April 25 to 26, 2025. At the award ceremony for this competition, 1st, 2nd, and 3rd place winners will receive not only a cash prize but also a trophy or plaque to honor their achievement within one of the competition's 10 research categories. Each of the 10 research categories will have graduate and undergraduate winners. In years past, awards were traditional and uniform, such as the black folders seen in Figure 1-1 below. This year, CPH wants to hand out trophies and placards uniquely designed and fabricated by Engineering Students at CPH, each built in large part using the brand-new Swetman maker space on the CPH campus. This is a chance for CPH to do things differently than in past competitions and hand out non-traditional trophies that display their student's hands-on abilities in engineering and design.
The Introduction to Design (ENGR 205) class at CPH was brought on by a client in the Fall semester of 2024 to build these trophies and placards. The class broke off into twelve teams to tackle the project. Each of 10 teams were assigned to create two trophies for the graduate and undergraduate 1st place winners of one of the 10 research categories. 2 teams were assigned to create 2nd and 3rd place placards. The client for the entire project is the Sponsored Programs Foundation (SPF), represented by Sam Caudill. The client representative met weekly for the large part of the Fall 2024 semester with each of the twelve teams to discuss their projects. The client desires a creative new approach to how awards are given out at the CSU Student Research Competition. The client requested the 1st place trophies to show both the personality of CPH and relate to one of the ten academic categories of the competition.
Team ID, including engineering students Daniel Korn, and Andrea Worden, was assigned to the challenge of creating two finished 1st place interdisciplinary trophies, for the graduate and undergraduate winners respectively. These trophies will represent the culture of CPH and the Interdisciplinary Studies category of the CSU Student Research competition.
Problem statement
The objective of this project is to design, fabricate, and test two trophies to be later awarded to the 1st place undergraduate and 1st place graduate student research teams for the interdisciplinary studies category at the 39th annual California State University Research Competition. The trophies will both be built using the same final trophy design. The trophies will showcase the culture and hands-on approach of CPH and will be fabricated in large part by utilizing the tools in the Swetman Makerspace on the CPH campus. The trophies will represent interdisciplinary studies in order to celebrate the academic achievement of the winning student researchers who are the recipients of these trophies.
Criteria
The criteria for this project are measurable and quantifiable standards decided on by Team Id and the client for this project, that will ensure the project best meets the clients goals and priorities. They are weighted, with 10 being the most important to the client.
Table 1: Criteria and constraints weighted by relative importance
| Criteria | Description | Weight (1-10) |
|---|---|---|
| AESTHETICS | Be as professional and more inspiring as a traditional trophy; it visually embodies the interdisciplinary category and CPH culture | 10 |
| SAFETY | Cause no injury or harm to users under normal use; Under 15 lbs in total weight; Meet TSA guidelines | 9 |
| DURABILITY | Last a lifetime if stored in a stable indoor location at room temperature with occasional designated interaction; Must be capable of withstanding daily handling, and car/plane transportation | 7 |
| INTERACTIVITY | Contains aspects the user can interact with; Interaction is easy to understand (user-friendly) | 5 |
| COST | Cost does not exceed $425 | 3 |
Prototyping
Multiple prototypes were created throughout the design process, each moving Team ID towards a better final product. At each stage, Team ID showed these prototypes to people to get feedback which led to many of the decisions described below.
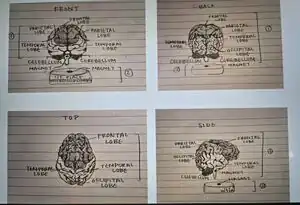
Team ID's initial sketch, shown in Figure 1-A, is a floating brain of 5 biologically inspired brain sections (Frontal Lobe, Parietal Lobe, Temporal Lobe, Occipital Lobe, Cerebellum) rather than the 4 even pieces and 5th cerebellum piece of the final design. This sketch takes an approach that is as realistic as possible, which might suggest themes of health, medical science, psychology, or biology, when the goal is to represent interdisciplinary studies. Another problem with this initial sketch is that the timeframe of this project was within one 16-week semester, and making brain sections true to life while maintaining good craftsmanship would have been more time consuming than the timeframe allowed. This led to the decision to divide a brain into 4 even quarters, maintaining only the cerebellum in its biological form. Finally, the initial sketch is of a brain floating above a base, the idea being to use theories of electrophysics and magnetism, such as the way floating maglev trains use magnetic levitation to float above their track. Team ID decided against the floating brain because of timeframe and budget, and because floating might distract from the interdisciplinary theme.
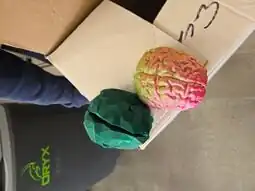
For further prototyping, Team ID 3D printed 2 small-scaled brains, shown here in (Figure 1-B). In the figure, the brain on the left is a geometric style brain whereas the brain on the right is a more realistic style of brain. The client feared that the geometric brain was too abstract, and viewers would not be able to recognize it as a brain, especially after the further manipulation into different 5 materials. However, since we got a lot of positive feedback on the abstract brain, it was decided this was a "goldilocks" problem, and a 3rd brain was chosen for the final design which is somewhere in between the styles of these geometric and realistic prototypes.
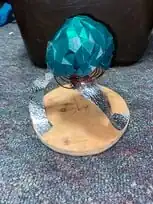
Figure 1-C shows one of the prototypes lifted on a prototype of a spiraling base, to replace the floating brain idea. If this had been implemented in the final design, the silver spiral columns would be replaced with clear acrylic, and these columns would be attached to a redwood base. Through this prototyping process, Team ID decided the spiral base lowered safety and durability of the trophy, and a complicated base might distract from the brain itself. The redwood base was kept in the final design but with an unattached brain resting on a short, simple stand.
Final product
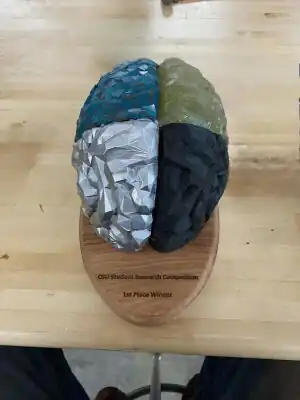
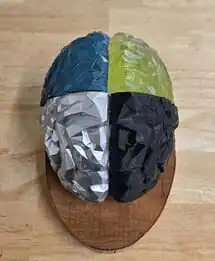
The final product consists of 2 components.The brain itself and the wooden base.
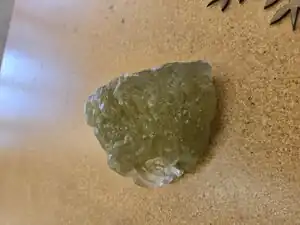
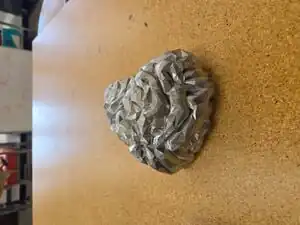
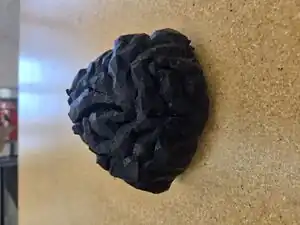
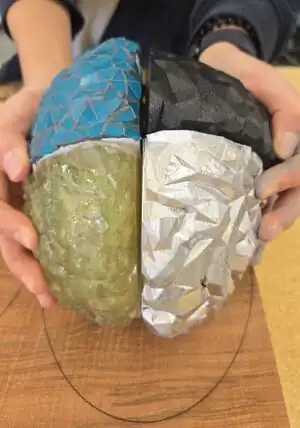
The brain itself consists of 5 sections. Figure 1-D shows the the front right section of the brain which is clear resin with hints of green and gold alcohol dye. Figure 1-E shows the front left section of the brain which is a white 3d printed filament spray painted with a metallic paint. Figure 1-F shows the back right section of the brain which is a 3d printed filament with blue acrylic triangle pieces attached to the filament and black grout to fill in the gaps. Figure 1-G shows the back left section of the brain which is a black squishy 3d filament. Figure 1-H shows the bottom section of the brain, also known as the cerebrum, and this section is made out of clay from a construction site on CPH. All 5 of these sections are attached together permanently to make one solid human brain. Once all the pieces are together the brain is roughly 3 to 4 inches tall, 8 to 9 inches long, and 5 to 6 inches wide. The solid brain weights between 1-2 lbs.
The wooden base consists of 2 sections. The oval first bottom piece is made out of redwood and it's dimensions are 1.5 inches tall, 10-11 inches long, and 6-7 inches wide and the base weights about 0.5-1 lb. The base has a laser engraved plaque that reads "CSU Student Research Competition 1st Place Winner" on the front edge of the base. The second piece located at the back end of the oval and acts like a stand. It is shaped like a "W" so that it fits into the bottom piece of the brain (the cerebellum). The reason for the second piece is to prop up the brain at an angle when the brain is at rest. This second piece is about 1-2 inches tall and about 2-3 inches wide, and .25 inch thick.
Construction
2 trophies were constructed simultaneously. For each trophy, 5 brain sections (Squishy 3D, Acryllic Mosaic, Metallic Paint, and Resin with Dye, Clay cerebellum) were crafted separately and then glued together. The base was constructed last.
3D modeling:
A pre-existing 3D model of a brain was purchased online and Solidworks 3D modeling software was used to size the brain (8 inches front to back), remove the cerebellum section, and cut the model into 4 quarters. Each quarter was saved as a separate stl file, which were modified and printed as needed for each brain section.
Squishy 3D print section
The squishy 3D print section, pictured in Figure 1-G, was 3D printed with TPU (thermoplastic polyurethane) material. The stl file of the front quarter of the left hemisphere was used for the prints. Before starting trials of the full brain section, 10 tester cubes were printed to test different types of infill patterns, and the "honeycomb" infill was tested by printing a small slice of the brain section. The tests went successfully. The first trial for a final piece used 85A TPU filament with 5% "honeycomb" infill and came out feeling almost hollow and very flimsy. The 2nd trial used a different 3D printer which can print support material that can be dissolved afterwards, theoretically leading to smoother surfaces. However, possibly because of poor choices in settings, this print came out looking very poor with loose filament strands. The 3rd trial went back to the original type of printer, used for all final pieces, and was printed using 95A TPU filament with 20% infill. This came out much harder and more durable, but still slightly squishy, and was used as the final piece for this section. Time ran out to complete a 4th trial, which would have involved either the 85A TPU with more than 5% infill or the 95A filament with less than 20% infill. The final piece had a lot of support material on the surface which took about 2 hours to remove, using small knives. A smoother surface could have been achieved by outsourcing the print to a professional 3D printing company, but Team ID felt that it was more meaningful to make the section themselves, thus tying in with the objective of displaying CPU culture and the students hands-on abilities.
Metallic Paint
This section, pictured in Figure 1-E, was 3D printed using PLA (polylactic acid) and then coated in primer, metallic paint, and a enamel finish. The stl file of the front quarter of the right hemisphere was used for the print, and Rust-oleum sprays were used for the primer, paint, and enamel. Newspaper was laid out to contain the spray as much as possible, and small pieces of wood were used to elevate the pieces so they could be sprayed evenly on each side. 3 coats of primer spray, 5 coats of metallic spray paint, and 2 coats of enamel finish were applied to each piece.
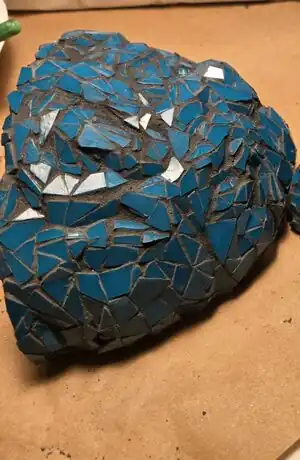
Acrylic Mosaic
The acrylic mosaic section, seen in the back left of Figure 1-H, was 3D printed slightly smaller than the other sections, and then covered with small pieces of a blue acrylic sheet and grout. The stl file of the back quarter of the right hemisphere was sized down using PrusaSlicer by reducing the vertical z-axis by 5.2 mm (twice the width of the blue acrylic sheet). The sheet was broken apart into pieces the size of the small geometric surfaces of the 3D print, and these acrylic pieces were glued directly to the print using E-6000 glue. Next, grout was applied, making sure to fill all cracks between the acryllic pieces. Excess grout was removed using a sponge and paper towels were used to clean any remaining haze from the acrylic pieces.
Resin with Green and Gold Dye
The resin section, pictured in figure 1-D, was made by 3D printing the section using PLA material, using alginate molding powder to create a mold, pouring resin into the mold, and letting the resin cure over about 5 days to a week. The stl file of the back quarter of the left hemisphere was used for the print. A screw was drilled into the side of the print that is completely flat, so that it could be easily lowered into the alginate. Alginate powder was mixed with equal parts warm water, as quickly as possible with a drill bit extension. The brain section was lowered into the mixture and allowed to set for about 15 minutes. The brain section was then carefully removed, the mold was coated in vaseline, and a mixture of equal parts of epoxy resin and hardener was poured into the mold. After about 5 minutes, green and gold alcohol dye was added to the resin using wooden coffee stirrers.
In the first trial for this section, the resin was left to dry for too long before attempting to add the dye, so no dye was added and the section turned out clear with a slight yellow tint. In the second trial, the resin was poured all at once and the green and gold dye were mixed too much leading to a murky brown-green-gold color. In the third trial, the resin was poured in layers and a different green dye was used, leading to the bright green color seen in Figure 1-H. One section from the 2nd trial and one from the 3rd were used in the final trophies.
Clay Cerebellum
Clay was obtained from a construction site on the CPU campus for this section. The clay was wedged to prepare it for hand building, then it was shaped by hand using the 8 inch 3D model as a guide. It was then allowed to dry for several days, and any cracks were smoothed out during this time. It was decided not to glaze the final pieces so as to provide a more rustic look and the ability to touch the actual material sourced from the CPU campus.
Attaching the 5 brain sections
The 5 sections were attached using Devcon home clear 5-Minute Epoxy. The Epoxy was mixed and applied to the brain using small pieces of cardboard. The brain was attached one section at a time, using clamps to hold the pieces in place as the glue dried. The glue was allowed to dry for an average of 15 minutes. The cerebellum was difficult to attach as it had limited surface contact with the brain, so larger amounts of glue were used for that section.
Bill of materials
The Table 1 below show the breakdown of costs spent on this project. The total spent is $115.75 US dollars, which was well below the total budget of $425 US dollars.
Table 1: The breakdown of money spent on this project.
| Item | Amount | Cost per unit | Total |
|---|---|---|---|
| Resin Dye | 2 | USD 3.75 | USD 7.50 |
| Black Grout | 1 | USD 20.00 | USD 20.00 |
| E6000 Glue | 1 | USD 7.00 | USD 7.00 |
| Clay (lb) | 1 | USD 0.00 | USD 0.00 |
| 3D print filament | 1 | USD 30.00 | USD 30.00 |
| 3D squishy print filament | 1 | USD 15.00 | USD 15.00 |
| 2",12",10" Redwood | 3 | USD 0.00 | USD 0.00 |
| Resin (gal) | 2 | USD 0.00 | USD 0.00 |
| Alginate Molding (lb) | 1 | USD 40.00 | USD 40.00 |
| 24",12",.25" Blue Acrylic | 3 | USD 0.00 | USD 0.00 |
| Grand total | Cost::USD 119.5 | ||
Operation
Outlined in the section below is the operation of the Brain trophy. One can compare the operation of placing an object in its designated location.
Remove the Brain by picking it up with two hands from any orientation.
Place the brain with the "front" of the brain nearest the trophy plaque and the underside of the brain facing the redwood base. Place the Brain so that the cerebellum meets the wooden stand on the redwood base.
Maintenance
Maintenance on the Brain Trophy is expected to be very minimal. There are weekly, monthly and yearly maintenance activities detailed below. Maintenance can be performed by the average citizen. Nothing is technically complex to maintain.
Maintenance schedule
- Daily
- None
- Monthly
- Dusting the whole brain
- Yearly
- Polishing the redwood base (Optional)
- Make any repairs with Epoxy Gorilla Glue or a similar glue
Conclusion
Testing results
The testing results showed that a round base would look odd underneath an oval brain. The tests also showed that having a brain that would open up in the middle would lower the durability of the trophy and the ease of use.
Discussion
To combat how the spiral base would lower the durability of the whole trophy and the transportability the spirals weren't added to the trophy. The trophy istead just sits on the wooden base. To fix the issue of how the oval brain looked on a round base, the base was changed to an oval shape instead of a perfectly round circle. Instead of having the brain open up the brain doesn't open, all of the 5 pieces are permanently attached which increased the overall durability and transportability of the trophy.
Lessons learned
There were many lessons to have learned from this project if it were to be created again. For the acrylic section, having multiple little premade acrylic pieces would have made the process go by much quicker. For the squishy 3d print section, having prototyped multiple little cubes of the PLA/TPU that we used on different types of setting would have made that section more professional. For the resin section having a clear resin would have made the piece look more professional and a little easier to work with. Doing research and little tests on resin would have made the whole resin section process easier.
Next steps
For the future of these trophies, they are to be displayed in an art gallery before being given to the Interdisciplinary winner of the 2025 CSU Research Competition. When they are being stored in the gallery anyone can come by to look at them, touch them, take photos of them, etc. During the ceremony the trophies will be constantly handled by the multiple people involved in the ceremony. After the ceremony the trophies will be transported by car or by plane to their final destination and will most likely live out their life on the winners bookshelf.
Troubleshooting
| Problem | Suggestion |
|---|---|
| Brain Falls Apart | Take any type of glue and attach to areas that fell apart or needs glue |
Team
- Lonny Grafman
- Emilio Velis
- Daniel Korn
- Andrea Worden
.jpg)