CSU Research Competition 2025 Education trophy
These are trophies awarded to the undergraduate and graduate winners in the education category at the 39th annual CSU Student Research Competition. The trophies were created by the Enginerds team of Engineering 205: Introduction to Design in collaboration with the Cal Poly Humboldt Makerspace in the Fall 2024 semester. These trophies were commissioned to provide a unique award for the winners of the competition, making their talents stand out while showcasing outside-of-the-box designs and challenging the design of traditional trophies.
Background
The project consists of designing and building trophies for the graduate and undergraduate winners in the Education category of the 39th annual California State University (CSU) Student Research Competition. The CSU Student Research Competition is held each year in the spring semester to award and recognize graduate and undergraduate students for creative scholarship and research. The competition consists of students from all 23 CSU campuses and includes ten disciplinary categories. The 2024 39th CSU Student Research Competition will be hosted by California Polytechnic State University, Humboldt. The Enginerds were assigned the Education category and are working with Sam Caudill.
Problem statement
The objective of the Enginerds’ design project is to design and build unique trophies specific to the first-place graduate and undergraduate students in the education category of the CSU Student Research Competition. The trophies are designed with the intent to push beyond the societal constructs of standard trophy award designs.
Criteria
Criteria and constraints, provide quantifiable metrics to focus on when designing the project, and constraints provide the basic standards that the project must meet to fulfill those criteria.
| Criteria | Description | Weight (1-10) |
|---|---|---|
| Category Relevance | The viewer should be able to easily understand the trophy as relating to the theme of education. | 10 |
| Durability | This will be read by people outside the US and in the future, so be sure to add enough context. Consider that most people might not even know where Arcata is. | 8 |
| Transportability | The easier for it is for the trophy to be moved by the recipient, the better. | 8 |
| Cost | The trophies should collectively not cost more than the budget of $500 to produce, cheaper being better. | 5 |
| Interactivity | The trophies should be intuitively interactive with little to no instruction, even if they just look great and are only visually interactive. | 4 |
| Upkeep | The components used in the trophy should be easy for the recipient to replace and maintain. | 2 |
Prototyping
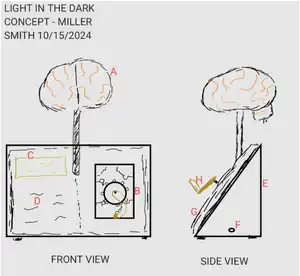
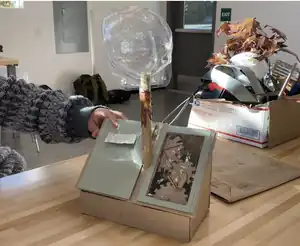
The first prototype was designed based on the “Light in the Dark” drawing concept created by Miller Smith. It was created using a cardboard base and cardboard book. Layers of paper were laid on top of the cardboard book to mimic the look of paper pages. A rectangle was cut out on the right side of the book to house the gears. The gears were also made of cardboard and cut out by hand. They were fixed in place in the cutout using clear tape. A gold push pin was added to the middle of the gears to determine the placement of the cardboard gear crank. The brain was created using a plastic mask casing and placed on the cardboard stem. The first prototype gave us a better idea of the future dimensions needed for the base, book, brain, and gears. It also allowed us to decide that the brain’s placement needed to be changed as well as the crank’s placement.
| First Prototype | |||
|---|---|---|---|
 First trophy design drawing for Enginerds Prototype 1 |
 First prototype build of Enginerds education trophy. | ||
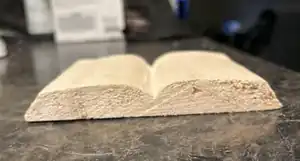
When creating the second prototype, we discovered that the dimensions of the base needed to be smaller to fit the dimensions of the hand carved wood book. The hand carved book was smaller than that of the final trophy mainly due to the lack of materials, but it proved to be a sturdy and easily carvable medium. Gears were designed in tinkerCAD and 3D printed using black PLA filament. The second prototype helped us determine that the teeth of the gears needed to be more precisely designed to ensure that they turned together properly. The brain was also designed in TinkerCAD and 3D printed using black PLA filament. We learned that the PLA filament was a strong enough material for both the brains and the gears. The process of printing both the gears and the brains allowed us to refine our print settings for the final trophy.
| Second Prototype | |
|---|---|
 Second prototype of the hand carved book. |
 First prototype of hand-carved book and 3D-printed gears. (Photo taken by Jack Prieto) |
 Gears being 3D printed for the second prototype. |
 The second prototype of the trophy base. (Photo taken by Jack Prieto) |
 Second prototype of the 3D-printed brain for the trophy. | |
Final product
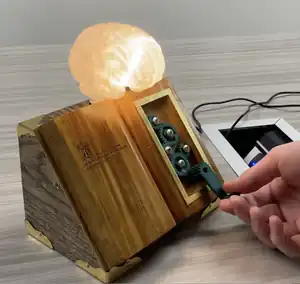
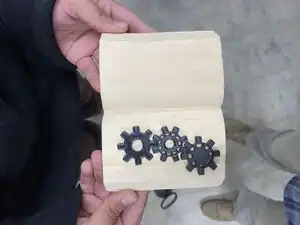
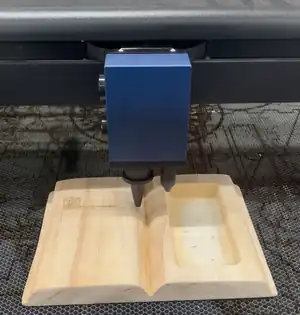
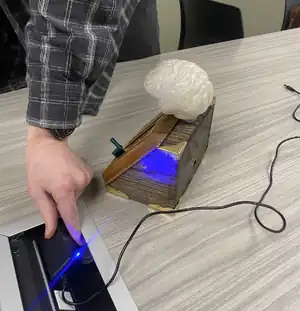
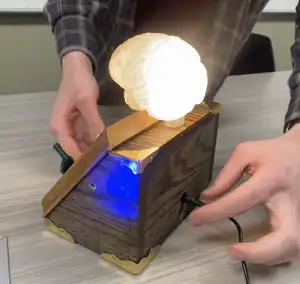
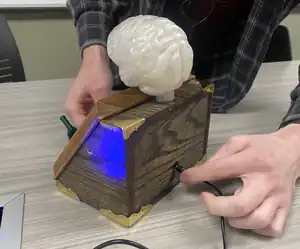
The final trophy is an open book set on an angled base. The book page on the right has gears placed in a hollowed out window. Rotating a crank at the base of the gears lights up the brain in a pulsating pattern.
This is the final trophy designed created by the Enginerds for the 39th annual CSU Student Research Competition.
Base built and designed in AutoCAD by: Jack Prieto
Book carved by: Noelani Anderson
Brain, gears, and electronics programming by: Miller Smith
Assembled by: Noelani Anderson, Jack Prieto, and Miller Smith
Construction
The sections below include detailed descriptions of the construction of each component used to completed the trophies.
Trophy Bases:
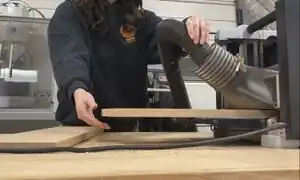
The trophy bases were first designed in AutoCAD to ensure correct dimensions. A six foot 3/4 " thick red oak wood plank was used to build the bases. The bottom, side balls, and top of the base were all cut using a laser cutter. The AutoCAD file used to design the base was transferred into a pdf and uploaded on to the laser cutter to cut the wood. Prior to laser cutting the wood, the wood was cut into two sections, 21 inches long and 26 inches long, then planed to 3/8" thick. Once the wood was laser cut the bases were assembled using wood glue and held together using woodworking clamps while the glue tried. After the glue completely dried on both bases they were sanded down to create smooth and even edges. The bases were stained using an ebony wood stain after sanding was completed. Once the stain dried for five hours the bases were coated in a polyurethane sealant to protect the wood. After staining and sealing the bases decorative gilded edges were nailed on each corner of the bases.
| Construction of Trophy Bases | |||
|---|---|---|---|
 AutoCAD design used for dimensions and laser cutting the trophy bases. |
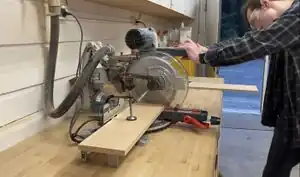 Cutting the wood into sections before the planing process for the trophy bases. | ||
 Planing the red oak to 3/8" thick planks. |
 Laser cutting the 3'8" thick red oak planks for the trophy bases. | ||
Books:
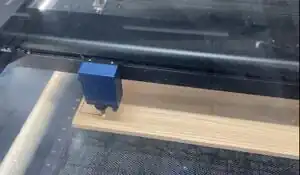
We started with a 7.5 x 3/4 x 48 inch plank of poplar wood and cut off 5.5 inches of length. We kept the other dimensions of the plank as these accounted for later adjustments. The exact midpoint of the 7.5 inch side was measured and marked to later become the seam of the book. Another mark was made along the width of the book that is 50 degrees from the bottom corners; these will be cut along to appear as pages, with 3 millimeters left at the bottom to act as the cover of the book. A router with a bit that was an inch wide and 90 degrees from the top was used to cut along both the middle and the sides. A saw was taken to make the middle seam slightly deeper, and then a straight chisel was used to smooth out the sharp turns. The same chisel was used to increase the degree of the page edges and slightly taper down away from the middle. This was sanded down smooth. On the right side, a 11 cm by 5 cm window was drawn on to later become the window for gears. The corners of this window were made using a drill press that went all the way through the book. These corners were connected using a scroll saw, creating a hole through the book. These edges were straightened and refined with a chisel. The plate that sat on the back of the book needed a place to sit in so it would be flush with the entire back. This was done entirely by hand with a chisel and then glued down and gaps filled with wood filler. The hollow was sanded to satisfaction and then holes were made with the drill press in places where we wanted gears to lay. The gears are held down by screws and lay on top of washers so when the crank in the corner is turned, they all turn together. The left side of the book is where the first place plaque is etched using a laser engraver. It is an original design by the team with inspiration from old story books, and traditional trophy plaques. The whole book is stained with golden oak stain and coated with clear polyurethane finish.
| Construction of Trophy Books | |
|---|---|
 Laser engraving award text on the books. |
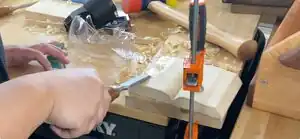 Woodwork carving process for book construction. |
 Text laser engraved into the books. | |
Gears and Hand Crank:
The gears used in the book are 3D printed from green Prusa 3D PLA filament using a Prusa MK3S 3D printer at 15% infill with gyroid infill. Two sizes of spur gear were created by using the website evolventdesign.com to create the outlines of the gears, which were then imported into TinkerCAD and extruded to a depth of six millimeters. All of the gears have an internal diameter of 6.05mm, the larger have a diameter of 27mm, and the smaller have a diameter of 17.8mm. Also printed with the gears are washers and sleeves for the 4.6mm diameter screws that hold the gears in place. The crank is designed using one of the 17.8mm gears extruded upwards to 16mm.
| Construction of Gears and Hand Crank | |||
|---|---|---|---|
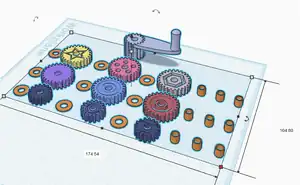 3D model of gears and hand cranks in TinkerCAD. |
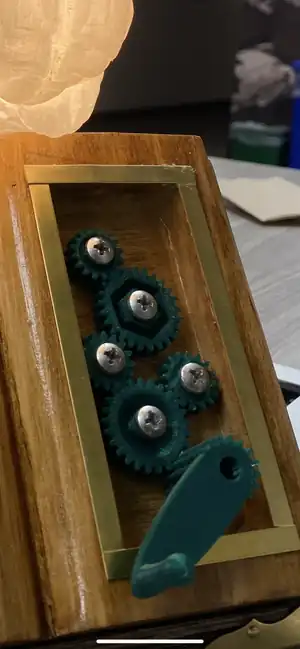 Gears and hand crank screwed into the final trophies. | ||
3D Printed Illuminated Brain:
The Brain is printed in two halves from clear PLA filament using a Prusa MK3S 3D printer at 10% infill with star-pattern infill. The brain model by cults3d user BEEROCLOCK is used under the personal use license of cults3d.com, and modified in TinkerCAD to hollow the interior and add the 19.05mm diameter attachment plug. After printing, three pairs of warm white 300mm flexible filament LEDs are glued around the rear, middle, and front interior of the brain before it is closed, and their anodes and cathodes placed through the hole in the brain’s attachment plug.
| Construction of Brains | |||
|---|---|---|---|
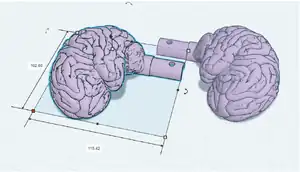 3D model in TinkerCAD used to 3D printed brains for the trophies. |
Electronics:
The electronics of each education trophy consist of an Arduino Uno REV3, three pulse width modulation integrated circuits, a 5.5mm jack socket, a 10k ohm potentiometer modified to rotate a continuous 360 degrees, three 30 ohm 2 watt resistors, and four 25k ohm resistors, and the six 300mm flexible filament LEDs in the brain. The components are connected according to the circuit diagram shown in the included image titled "Circuit Diagram". Two flexible filament LEDs are connected in series for the rear, middle, and front of the brain, as single LEDs. The Arduino is coded to read the voltage of the potentiometer and vary the brightness of each LED filament in a pulsing pattern according to where the potentiometer is in its rotation. An image of the code used in the operation of the education trophies is shown in the image titled "Ardunio Code".
| Construction of Electronics | |||
|---|---|---|---|
 Ardunio Code |
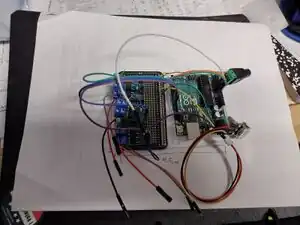 Electronic wiring setup for brain LEDs in trophies. | ||
Education Trophy Video
Bill of materials
This includes a breakdown of the bill of materials for the three phases of the project. The breakdown of costs for the first and second prototype are included, along with the breakdown of costs for two final trophies.
| Cost of Prototype 1 | ||||
| Item | Use | Quantity | Per Unit Price | Total Price |
|---|---|---|---|---|
| Cardboard Box | Book, Base | 3 | $22.99 | $0.00
(Free from Swetman Makerspace) |
| Plastic Respiration Mask Casing | Brain | 1 | $10.56 | $0.00
(Donated) |
| Clear Roll of Tape | Window above the gears | 1 | $3.15 | $0.00
(Free from Swetman Makerspace) |
| Cardstock Papers | Pages on Book | 1 | $10.99 | $0.00
(Free from Swetman Makerspace) |
| Grand Total | $0.00 | |||
| Cost of Prototype 2 | ||||
| Item | Use | Quantity | Per Unit Price | Total Price |
|---|---|---|---|---|
| Black 3D Printer PLA Filament | Gears and Brain | 3 | $22.99 | $0.00
(Free from Swetman Makerspace) |
| 5 Square Feet of Poplar Wood | Book and Base | 1 | $25.00 | $0.00
(Donated) |
| Grand Total | $0.00 | |||
| Cost of Two Final Trophies | ||||
| Item | Use | Quantity | Per Unit Price | Total Price |
|---|---|---|---|---|
| 10pcs MOSFET PWM IC | Electronics | 1 | $12.99 | $12.99 |
| 9V Arduino Power Supply | Electronics | 2 | $7.99 | $15.98 |
| 4pcs LED Filament 300mm | Electronics | 2 | $11.99 | $23.98 |
| 300mm Flexible LED Filament | Lights | 12 | $2.49 | $29.88 |
| Miniwax Ultra Flat Polyurethane | Bases and Books | 1 | $16.99 | $16.99 |
| Miniwax Ebony Stain | Stain used for Bases | 1 | $9.81 | $10.57 |
| 4 Pack Brass Corner Decoration 5/8 " | Gilded Bottom Corners on Bases | 2 | $5.39 | $10.78 |
| 4 Pack Brass Corner Decoration 1/2 " | Gilded Top Corners on Bases | 1 | $4.49 | $4.49 |
| Clear 3D Printer Filament | Brains | 1 | $22.99 | $22.99 |
| Arduino Uno Rev3 | Electronics | 2 | $27.60 | $55.20 |
| 5 Square Feet of Poplar Wood | Books | 1 | $25.00 | $0.00
(Donated) |
| 6 Board Feet of Red Oak | Bases | 1 | $26.70 | $28.77 |
| Dark Green 3D Printer Filament | Gears | 1 | $22.99 | $0.00
(Free from Swetman Makerspace) |
| Grand Total | $233.62 | |||
Operation
Operation of the trophy is simple and user friendly. Each step of operation is included below, along with detailed instructions.
Plug the included power cord into a 120V outlet. ONLY use a 9V power cord to power this device.
Plug the power cord into the port located on the lower backside of the trophy.
Turn the green crank that is attached to the gears. The crank is located on the right-hand side of the book. Increasing the crank's speed of rotation increases the speed of the light's pulsating pattern.
Unplug the trophy when it is not in use.
Maintenance
Maintenance for the trophy is minimal, care instructions are included to ensure longevity of the trophies.
Care Instructions
- Store in a dry place out of direct sunlight
- Unplug when not in use
- DO NOT use a power supply other than 9V
- Dust as needed
Maintenance schedule
Dust annually as needed.
Conclusion
Testing results
The education trophies were tested by having multiple peers and instructors view them and interact with the gear function.
Discussion
General consensus was that the trophies are aesthetically pleasing, and that the winners of the CSU research competition would be happy to own them. Many polled individuals commented on how they enjoyed the pulsing effect of the lights and the look of the book and writing.
Lessons learned
The lessons learned during this project were that more clear communication is needed to effectively design and build a project with greater ease. We also learned that the building process takes much longer than expected especially when it comes to the fine details of the trophy.
Next time we would establish a better strategy for teammate communication such as in person meetings. We would also establish roles for each teammate to avoid any confusion about who is assigned a certain task and set strict deadlines as to when each piece of the project must be completed. Starting the building process at an earlier time and slowly working on each aspect of the trophy far in advance is also a major change that would be implemented next time.
Next steps
As the project goes into the future the trophies will be awarded to the winners of the education category at the 39th annual CSU Student Research Competition in April 2025 held at Cal Poly Humboldt. The winners awarded these trophies will hopefully display their trophies with pride.
Troubleshooting
For complex issues, contact Miller Smith: mjs272@humboldt.edu
| Problem | Suggestion |
|---|---|
| Gears do not turn | Clean out the gears and make sure nothing is obstructing their motion. |
| Does not turn on | Ensure power cord is plugged into a 120V outlet. |
Team
The Enginerds team includes:
- Noelani Anderson
- Miller Smith
- Jack Prieto
- Corey Lee